What Type of Insulation Can You Leave Outside in the Rain and Sun
Relatively easy access has made the cranium a favourite starting signal to insulate for many homeowners, despite the fact that most other areas, such as basements and uninsulated walls, lose more heat than the typical attic. Fifty-fifty if an attic is already insulated, at that place may still be an opportunity to improve the energy efficiency and soundness of the house through air sealing and ventilation. Air leaks via the chimneys, vents, plumbing pipes and electric boxes in the attic can account for substantial oestrus loss and can pb to a diverseness of moisture-related bug. The importance of air sealing cannot be overstated. If you are upgrading your attic, read this entire department for helpful tips and other relevant information.
5.ane General CONSIDERATIONS FOR ALL ATTICS
Regardless of the blazon of attic or ceiling your house has, there are a number of things to examine before beginning work. A thorough inspection of the following features will help you lot to develop your retrofit strategy.
Accessibility
Most houses with accessible attics have an interior ceiling hatch, although outside roof or wall-mounted entries are not uncommon. A hatch should exist large enough to let y'all to bring in materials. If non, or if at that place is no access, you may be able to cut a hole in the ceiling in an inconspicuous place such every bit a closet. Exterior-mounted, gable-stop entries represent i less opening that will have to exist air sealed, which offers gear up admission to firefighters in the result of a fire.
Cheque the roof space for obstructions and ease of movement. Vertical clearances of less than i m (39 in.) will not allow you to move freely. Attics or roofs without a working space are covered later in this chapter, in Role v.4, Cramped attics, cathedral ceilings and flat roofs.
Assessments
In addition to checking for structural problems, check the condition of the roof framing, sheathing, finish and the soffit and fascia for signs of moisture problems such as leaks, stains, mould, flaking or rot. Uncorrected wet issues will reduce the effectiveness of insulation and tin can lead to structural damage such as wood rot or separate rafters. Mould or rot are sure signs of advanced condensation bug. Identify the crusade and correct information technology before adding insulation.
Moisture can come from the outside due to failure of the roof or flashing. Typical problem areas include poor flashing at a hip, valley or the chimney and ice dam leaks. Pay particular attention to water marks on the underside of the capsule or forth rafters.
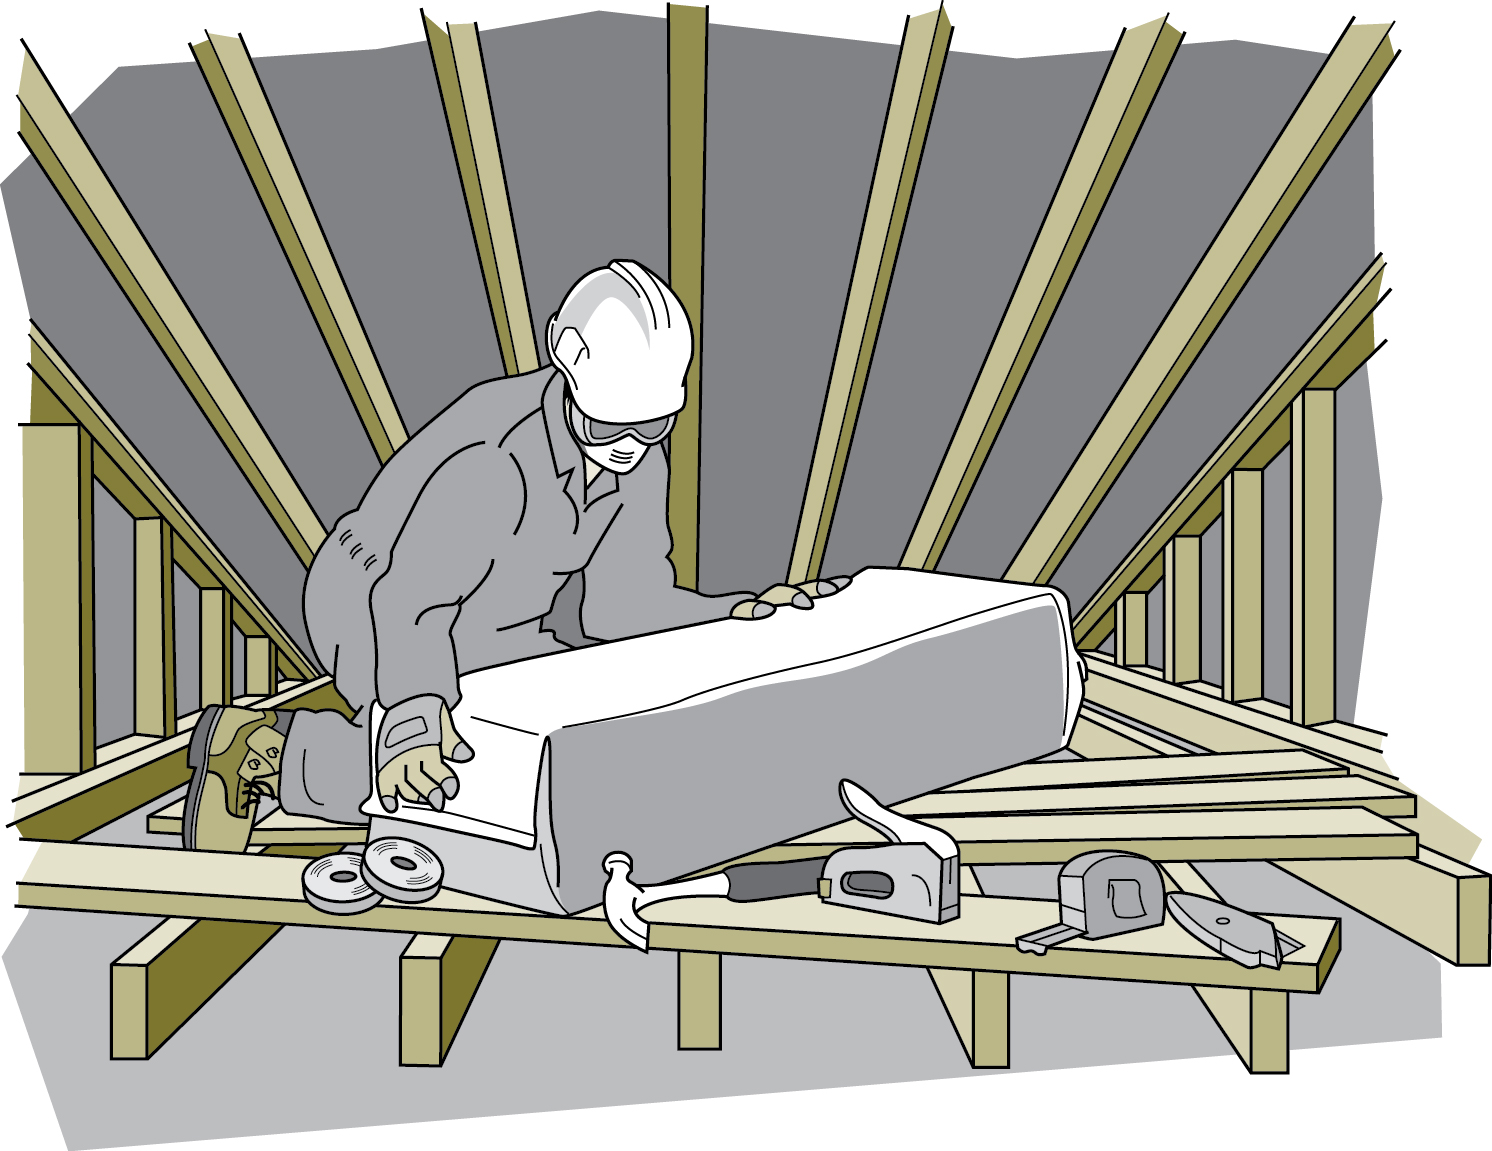
Figure 5-ii Some attics are easier to piece of work in than others
Larger image
Wet tin too come from inside the house, carried into the attic as water vapour by air leakage. Typical problem areas occur effectually bath and kitchen vents that penetrate the ceiling, around plumbing stacks and chimney chases and at wiring penetrations and pot lights. A tell-tale sign of air leakage is the discolouration of insulation, then do not hesitate to look under existing insulation to locate air leaks.
Check the attic during or just later a cold snap for condensation buildup, which will appear equally frost in cold climates. Some frost buildup is to be expected, only if information technology is peculiarly heavy buildup (10 mm [2 in.] or more than), look to make sure ventilation is present and not blocked with insulation. Checking the attic during or but after a rainstorm will help determine whether wet problems are generated by interior or exterior sources.
Examine the existing insulation for blazon, condition (dry out, wet, compact, etc.), average depth and coverage. If it has been damaged or contaminated by mould or vermin, remove it. However, do not disturb vermiculite insulation (meet Part one.4, Wellness and safety considerations).
If the insulation is wet, practise non cover it until the source of moisture is removed and the insulation is dry. If the insulation is dry, it will probably be all right to leave it in identify. More often than not, there is no problem in using two types of insulation. Check the depth of the insulation to determine its insulating value. Compare this with the recommended insulation values in Role 2.ii, Command of estrus flow.
Make certain that the insulation is distributed evenly and that there is full depth coverage, specially around the perimeter of the attic above the wall plates. Uninsulated areas volition cause a cold spot where the wall and ceiling run across, which can lead to moisture and mould problems.
Existing air and vapour barriers
Houses should have a vapour barrier on the warm side of the insulation. In older homes, the vapour barrier might have been provided by wax paper, kraft newspaper-backed batts or layers of paint. Newer houses ordinarily have a polyethylene sheet vapour bulwark, merely overall, very few houses have an constructive air barrier.
If at that place is an air barrier, locate it and decide its condition. Remember, an air bulwark must be continuous; holes or tears must be repaired, and penetrations sealed. Do not hesitate to pull dorsum existing insulation where leakage sites might be found and seal these areas. Nevertheless, do not disturb vermiculite insulation as previously warned.
Increased insulation means a colder cranium, which in turn means that any vapour escaping into the attic tin condense before it can be vented. Information technology is essential to air seal the attic to prevent moist indoor air from getting in.
If there is no air and vapour bulwark, concentrate on comprehensive air sealing. Create an effective air barrier by using caulking, gaskets and weatherstripping to seal the joints betwixt building components. Do not rely on batt, blown-in or poured insulation to reduce the demand for proper air sealing.
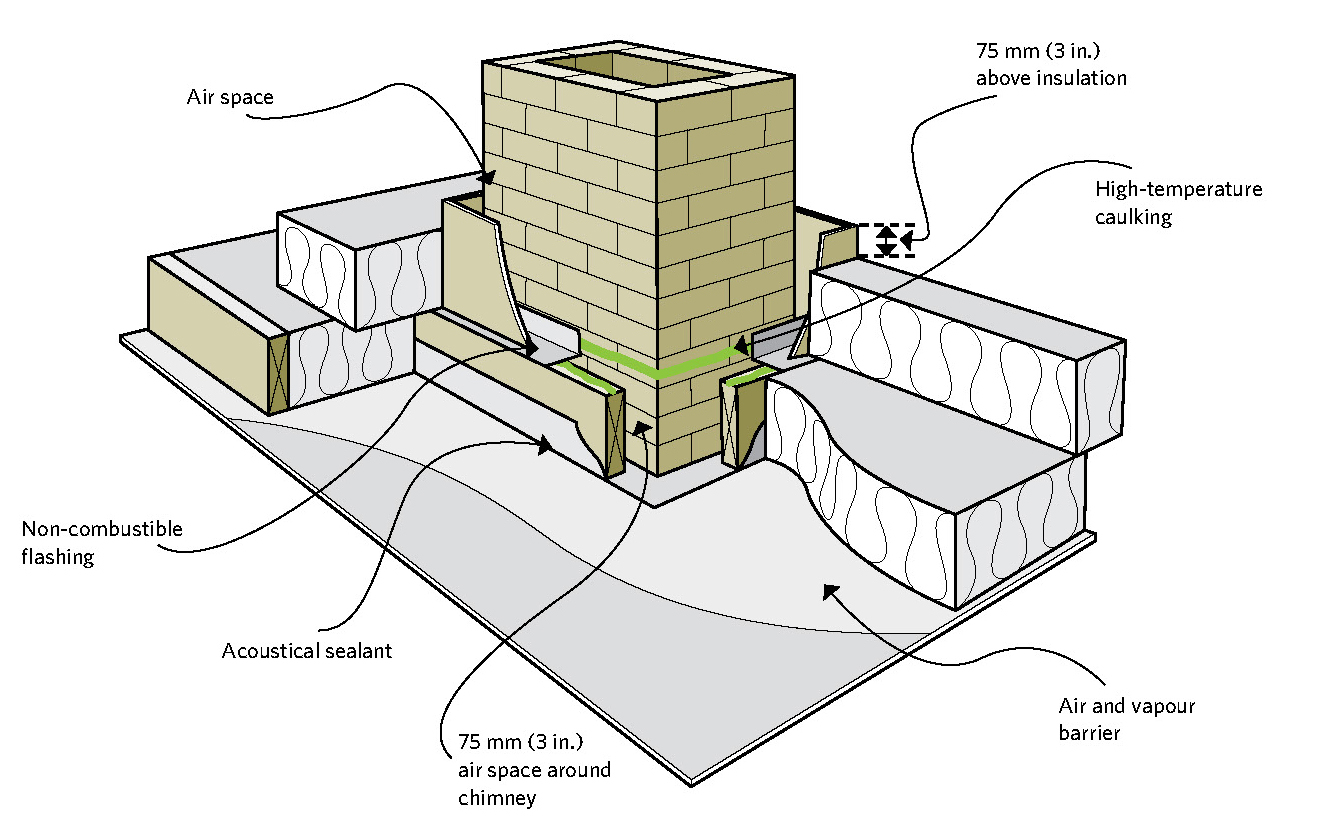
Figure v-three Keep combustibles away from a masonry chimney
Larger epitome
SAFETY Warning:
Certain areas in the attic can pose serious burn down and health hazards. Before air sealing and insulating an cranium, ensure yous or your contractor address the post-obit wellness and safety concerns.
v.1.2 Fire and other hazards in attics
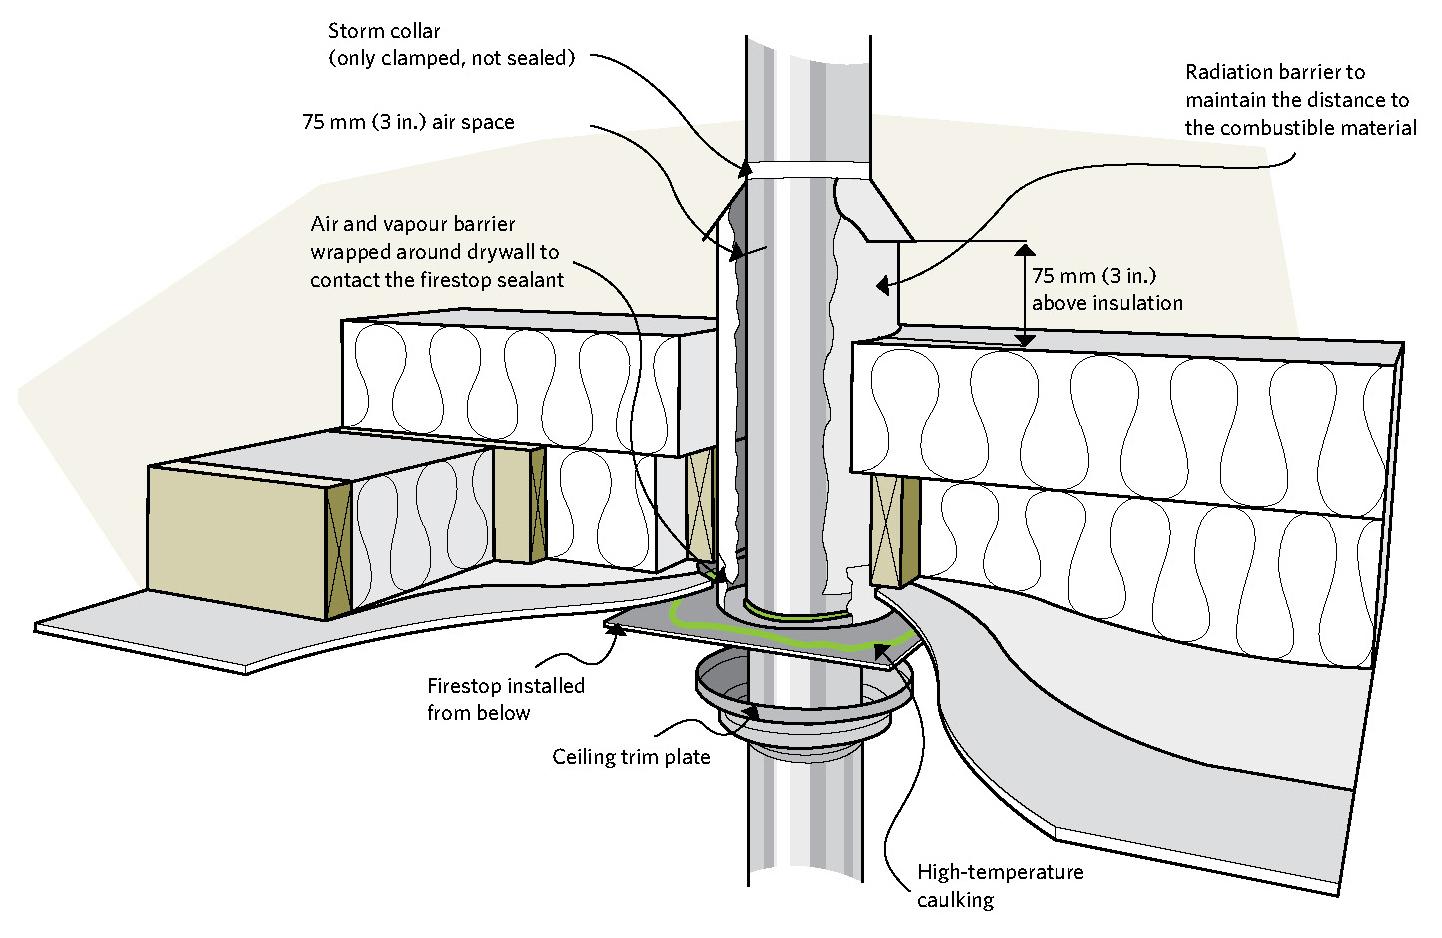
Figure five-four Keep combustibles away from an insulated metal chimney
Larger image
Text Version
Figure 5-4 Keep combustibles away from an insulated metallic chimney
- Tempest neckband (only clamped, non sealed)
- 75 mm (3 in.) air infinite
- Air and vapour barrier wrapped around drywall to contact the firestop sealant
- Firestop installed from beneath
- Ceiling trim plate
- Radiation barrier to maintain the distance to the combustible material
- 75 mm (iii in.) above insulation
- High-temperature caulking
Metallic chimneys
Mill-built metallic chimneys should be kept from contacting insulation by a minimum 75 mm (three in.) unless otherwise specified by manufacturer or local government. Install a non-flammable radiation shield that maintains a 75-mm (3-in.) air space between the chimney and insulation. To reduce air leakage, first air seal the burn stop to the air and vapour barrier with not-combustible sealant. The summit of the radiation shield should also be a minimum of 75 mm (3 in.) higher than the level of existing or new insulation to be added. To prevent insulation from falling behind the shield, attach a clamp-type storm collar without sealant at the top of the radiation shield.
Effigy 5-5 Keep insulation away from a recessed calorie-free fixture past creating a barrier
Larger image
Text Version
Figure v-5 Go along insulation abroad from a recessed light fixture by creating a bulwark
Minimum 12.5-mm (1/2 in.) clearance, 150 mm (half dozen in.) preferred
Heart the fixture if possible, keep it a minimum of 12.5 mm (ane/2 in.) from the sides and acme
12.5 mm (1/two in.) plywood box lined with a burn down-resistant fabric such as drywall or sheet metal to provide airspace around the fixture; caulk all joints and edges of the box to minimize air leakage
Minimum box volume – allow 800 cubic centimetres (cm³) per watt of the fixture (e.g. a 150-watt fixture would crave a 120 000- cm³ box)
Electrical installations
Work safely around electrical wiring (turn off the power). Consult with an electrical contractor if questionable wiring or corroded electrical connections are nowadays.
Recessed lighting
Standard interior recessed lights are difficult to air seal effectively and can become a burn down hazard if covered with insulation. Supersede with canonical airtight recessed fixtures or covers that can be installed safely nether insulation.
Creature debris
If you find a pregnant corporeality of creature debris and vermin in the attic, do not disturb them because they can harbour hands airborne moulds, parasite eggs and bacteria that can crusade astringent disease. See Part 1.4, Health and condom considerations, for more information.
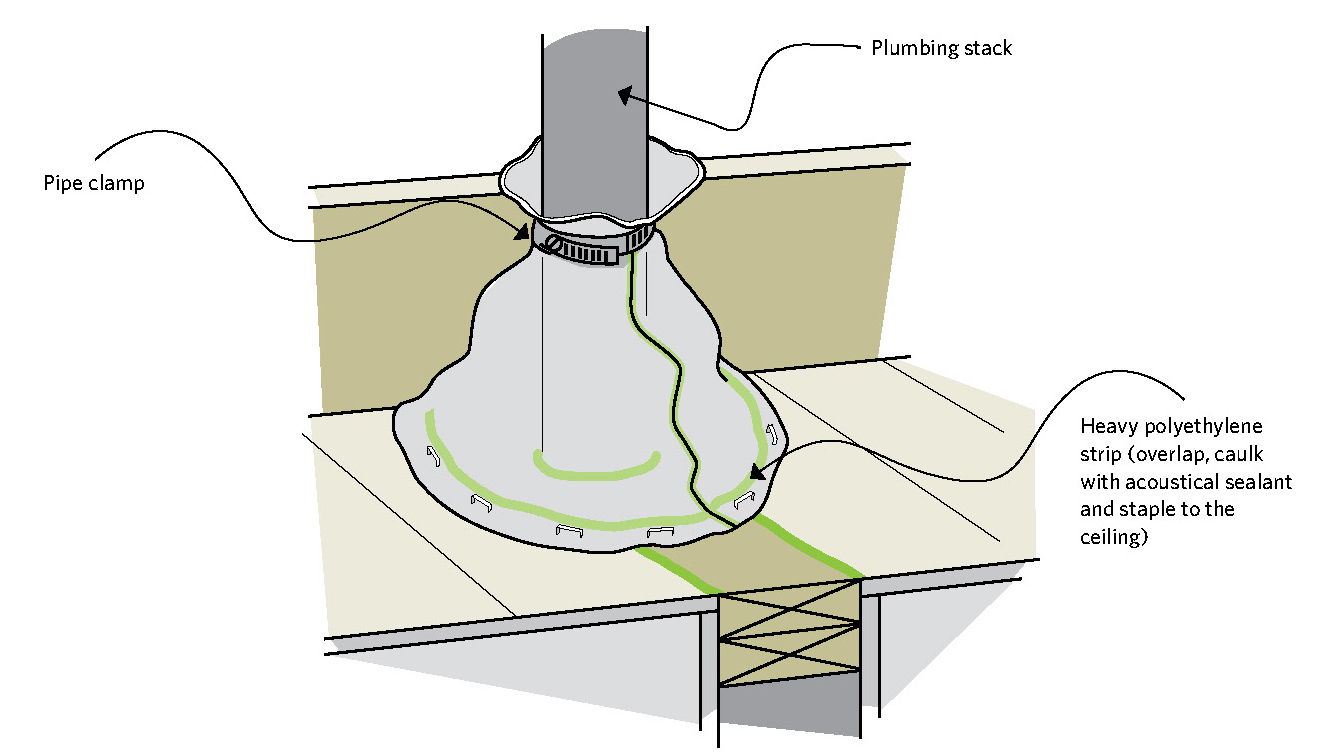
Effigy 5-6 Sealing the plumbing stack
Larger prototype
Text Version
Figure v-half dozen Sealing the plumbing stack
Plumbing stack
Pipe clamp
Heavy polyethylene strip (overlap, caulk with acoustical sealant and staple to the ceiling)
5.one.3 Air sealing
Seal the post-obit areas:
- Around the plumbing stack and any other pipes. For plastic plumbing stacks that move up and downwards due to thermal expansion, use a flexible gasket or a polyethylene sleeve sealed to a plywood collar (see Effigy 5-half dozen).
- Effectually wires or ceiling calorie-free fixtures that penetrate the attic floor and partitioning and outside wall tiptop plates (encounter Figure 5-7 and Figure 5-8.) Meet Part 5.1.2, Fire and other hazards in attics, on how to deal with recessed lights.
- Around ducting that enters the attic from inside the house. Seal duct joints with aluminum duct tape or paint or mastic. Seal the gaps where ducts penetrate the ceiling. The ducts should stay below the insulation or should be wrapped with insulation and be protected from beingness crushed. Exhaust fans should always belch to the exterior just not straight below the eave vents.
- At the junction of the ceiling and interior wall partitions, pull dorsum the insulation to locate and caulk cracks along interior walls (see Figure iv-four).
- At the height of interior and outside walls, bank check to encounter if all wall cavities are blocked from the attic (usually by a pinnacle plate). Block whatever open spaces in the exposed cavity with a slice of rigid board insulation and caulking. If the height plate is cracked or poorly fitted, use caulking and polyethylene to create a tight seal (see Effigy 5-7).
- Effectually attic hatches (run into Effigy 4-seven).
- Around the chimney. Building codes require that air spaces between chimneys and flooring or ceiling assemblies through which they pass be sealed with a non-combustible fire stop (see Figure 5-3 and Figure 5-4).
- Forth the border of shared walls. There is often a gap between the political party wall (i.east. the shared wall between units in duplexes, triplexes and row houses) and the edge of the attic floor. Ensure that this gap is well sealed. If you suspect that air is leaking up and out of a political party wall fabricated of physical blocks, hire a contractor to seal the blocks.
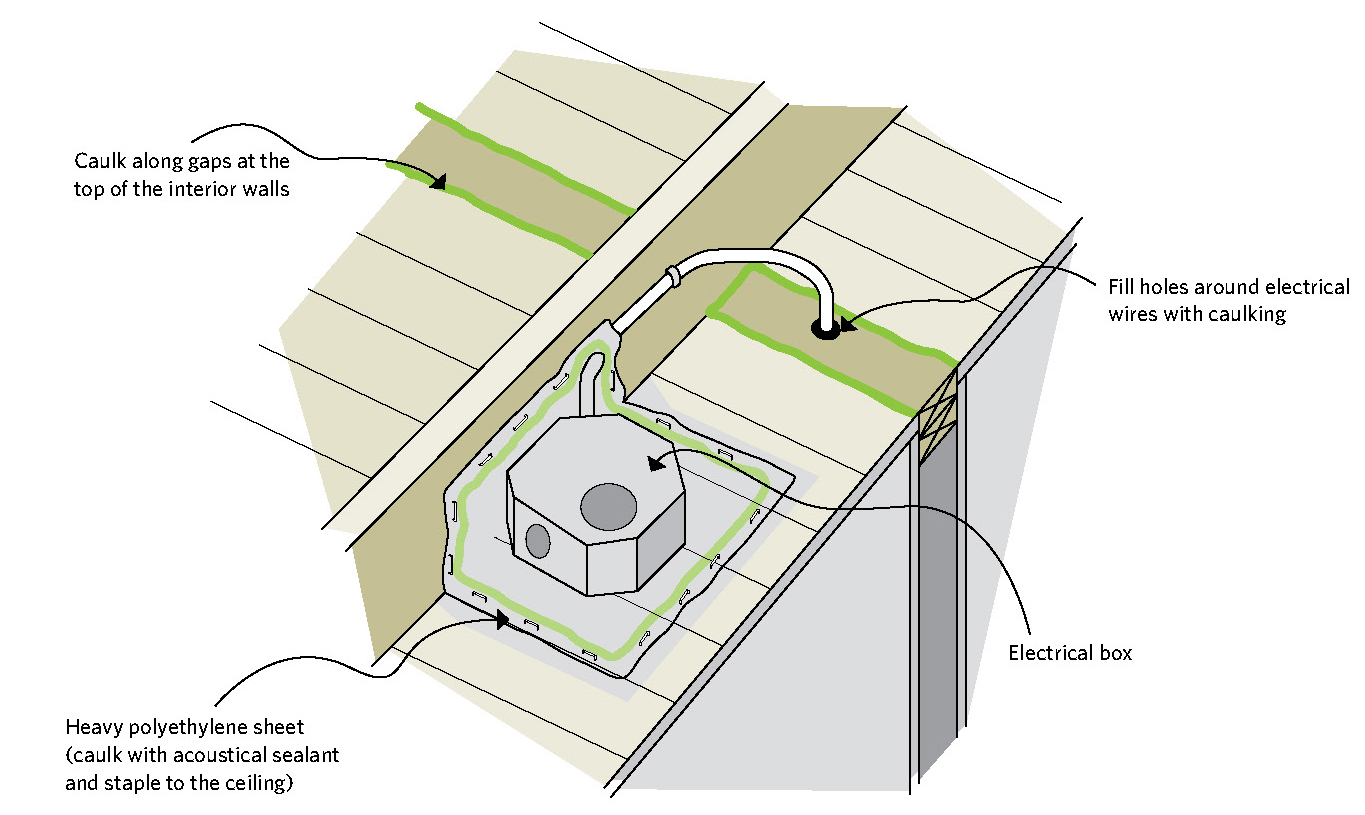
Figure 5-7 Sealing an electrical box. Run into Figure v-5 for the special case of recessed lighting electric boxes
Larger image
Text Version
Figure 5-7 Sealing an electric box
(Notation: See Figure 5-5 for the special case of recessed lighting electrical boxes.)
Caulk forth gaps at the top of the interior walls
Fill holes around electric wires with caulking
Heavy polyethylene canvass (caulk with acoustical sealant and staple to the ceiling)
Electrical box
5.1.4 Ventilation
Attic ventilation serves a number of purposes. It reduces summer estrus buildup, prolonging the life of roofing and reduces air conditioner loads. After air sealing, attic ventilation is your second line of defense against the water vapour that may have establish its way into the cranium. It ensures a colder, well-vented cranium space less prone to the formation of ice dams at the eaves.
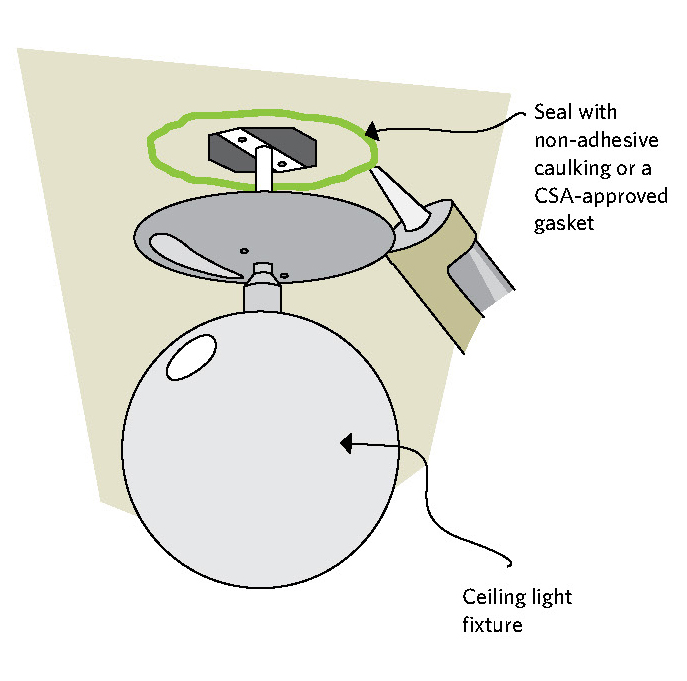
Figure v-8 Sealing a light fixture on the ceiling
Larger epitome
Houses with peaked roofs and attainable attics are the easiest to vent by using the ratio of ane to 300 (see below). This ratio refers to unobstructed vent expanse, so information technology must exist increased if vents are covered with screening (to proceed out insects, etc.) and with baffles (to go on out rain and snow), which reduce their clear area. Ideally, locate vents to allow for good cross ventilation from cease to end and from superlative to bottom. Even so, although important, vents will not forestall condensation and will not solve the problems created by air leakage.
Make sure that existing cranium vents are working properly and not blocked past insulation, debris or other materials. You may accept to locate roof or soffit vents from exterior if they are not clearly visible from inside the attic.
Although an airtight ceiling will significantly reduce the likelihood of moisture in the cranium, edifice codes however crave minimum attic ventilation. The ratio of vent area to ceiling area should be approximately one to 300.
Exercise not automatically increment ventilation. Too, do not utilize electric exhaust fans for cranium ventilation equally these can depict more air than can exist supplied through the soffit vents. This will actually pull house air into the attic, resulting in greater estrus loss and moisture accumulation. They are also prone to failure, noise production and increased energy utilisation. Wind-driven, revolving roof vents practise not create suction and are no more effective than other types of capped vents.
The location of vents is as important every bit their number and type. Ofttimes, a mixture of types and locations volition work best. The following Parts item the all-time approach depending on your attic type.
v.ii Easily Accessible ATTICS

Figure 5-9 Installation of polyethylene sheets over cranium joists.
Rigid foam board at the eaves to maintain ventilation space.
Larger image
Later you take inspected the attic and carried out any remedial piece of work, focus first on air and moisture command.
v.2.one Air and moisture command
There are five options for installing an air bulwark system in an unfinished cranium:
- concentrate on air sealing
- install polyethylene over elevation of the joists
- install polyethylene between the joists
- spray foam between the joists (hire a contractor)
- spray foam under the roof to create a conditioned attic (hire a contractor)
The first option is the well-nigh applied, since installing a polyethylene air and vapour bulwark in an existing attic is fraught with obstructions and requires painstaking attention to detail. On the other hand, spray cream offers air sealing and an initial layer of high quality insulation that can be topped upwards to the desired RSI (R) level.
If the attic retrofit is existence completed in conjunction with interior renovations, the easiest approach is to install a new, single air and vapour bulwark on the underside of the ceiling joists.
5.2.2 Concentrate on air sealing
It is a expert thought to paint the room side of the ceiling with two coats of oil-based paint or apply a unmarried coat of latex vapour bulwark paint to inhibit vapour move. Ordinary latex paint is not a suitable vapour barrier.

Figure 5-10 Foam board laid between the joists and caulked as an air and vapour barrier
Larger epitome
See Section 4, "Comprehensive air leakage control," for detailed data on sealing all air leaks into the attic.
Install polyethylene over top of the joists
If the attic is relatively unobstructed with chimneys, plumbing stacks or structural members, consider installing polyethylene directly over the ceiling joists. This method involves the least number of seams and requires less caulking and stapling than other methods. It also leaves existing insulation in place. However, seal all obvious air leakage paths earlier laying down the polyethylene.
To avoid trapping wet between the plastic and the ceiling, which might pb to possible forest rot or other moisture-related problems, install a minimum of twice the insulating value over top of the air vapour barrier (i.due east. applying the one-third, two-thirds rule). For example, if the joist elevation is 89 mm (3 ane/2 in.) and contains RSI 2.1 (R-12), install at to the lowest degree RSI four.ii (R-24) over top of the polyethylene.
The chief difficulty with this technique involves sealing the barrier to the wall top plate, especially at the eaves where there is lilliputian room to manoeuvre. This area must be well sealed. Spray foam or rigid board insulation tin can help span the gap in this surface area. Cut rigid board to fit between the ceiling joists and to extend from the exterior wall tiptop plate toward the attic. A second piece of rigid insulation, installed vertically, joins the polyethylene to the horizontal rigid board. Carefully caulk whatever joints or seams between materials. Expanding 2-part spray foam kits (or the service of a spray foam company) are besides very skilful for sealing areas effectually joists and boards.
Install polyethylene between the joists
Where obstructions, such as a truss roof, brand the previous method too hard, install a polyethylene air barrier or low-permeable foam insulation lath between the joists. Still, annotation that this is a lengthy and painstaking process.
Remove existing insulation from the area you are working on and gear up it to ane side. Cutting foam boards to fit snugly betwixt the trusses. Caulk all edges, gaps and joints. Obstructions, such as electrical wires, will require cuts in the bulwark; seal these carefully to brand the bulwark continuous. Another option is to cut the polyethylene strips about 200 mm (8 in.) wider than the joist spacing. Lay a bead of caulking on the side of the joists along their length and install the polyethylene using staples, installed through the caulk every 75 mm (3 in.) See Figure 5-10.
Spray foam between the joists
Spray foam contractors can install closed-jail cell foam betwixt the joists to air seal and add insulation at the same time to the ceiling. All existing insulation and dust must be removed first to allow for a expert bond. A minimum of 50 mm (2 in.) is needed; top up with other insulation afterwards.
Spray foam nether the roof
This arroyo involves installing closed-prison cell spray foam directly under the roof surface, right downward to the junction of the ceiling and outside walls. This eliminates roof venting and creates what is called a hot roof, where the cranium space becomes part of the conditioned (heated and cooled) house space. This procedure may exist suitable for some attics, but do not proceed without approval from your edifice inspector, and and then but use a certified spray cream contractor who is familiar with the process.
v.2.iii Installing insulation
Common materials for employ in accessible attics are batt or coating types or loose-make full insulation. If there are obstructions to a higher place the joists, such as with a truss roof, it may be easiest to put batt insulation into the joist spaces and then use loose-make full insulation to create a complete blanket of insulation in a higher place the joists and around all obstructions. Loose-fill up insulation is also skillful by itself, especially in irregular or obstructed spaces.
Batt or blanket insulation
Fit batt insulation into place between the ceiling joists snugly, without compression. If the joist space is non the standard 16 or 24 in. (400 or 600 mm), cutting the batts to fit the space or use loose-make full insulation.
Boosted installation tips:
- Butt batt ends together as snugly equally possible.
- Batts should cover the top plate of the exterior wall but not block the venting. To maintain airflow, leave a infinite of 38 to 50 mm (ane 1/two to 2 in.) between the top of the insulation and the underside of the roof sheathing. Utilise baffles betwixt each rafter space to prevent it from being blocked (see Effigy v-xi).
- Insulate above and beneath cross bracing, splitting or cutting the batt to accommodate the cross bracing as illustrated in Figure five-12. Alternatively, cut 1 batt into a serial of wedges and and then fit a wedge under each brace. In either approach, do not compress the insulation.
- The offset layer of batts should be thick enough to completely fill to the top of the joist space. The second layer can then run perpendicular across the joists to block any heat catamenia through and around the joists (see Figure five-13). Ensure that there are no gaps between the ii layers of insulation.
- Fill any awkward spaces or gaps with pieces of batt or with loose fill.
- Apply blanket insulation in the same way every bit batts. Information technology may be pre-cut with a pocketknife or cutting on the spot. Commencement at one end of the attic and unroll the blanket
Loose-fill insulation
- Loose-fill insulation can be poured by hand or blown in on top of the air and vapour barrier to a depth greater than the height of the joists. This chore can be washed by the homeowner using rented equipment or by a qualified contractor.
- Before calculation insulation, nail plenty depth indicators (e.g. a piece of wood nailed perpendicular to the joist) or mark highly visible lines on truss members so y'all tin can easily see and gauge the depth of the insulation. Maintain an fifty-fifty depth throughout the attic by levelling the insulation with a board or garden rake (run into Figure v-fourteen).
- Fill all nooks and crannies.
- At the eaves, exercise non block the ventilation. Prevent insulation from disappearing into the eave space past installing a piece of rigid board insulation or a wood bamboozle before the work begins. Edifice-supply stores sell cardboard or cream plastic baffles that can be stapled between the rafters (run into Figure 5-11). Be sure that the insulation extends out far enough to cover the top of the exterior wall.
- If the loose fill is deeper than the joists, build insulation framework (a crib) around the cranium hatch and then that information technology can exist filled to the edge (run into Figure 4-seven).
- The bags of insulation material will list how many foursquare metres (or foursquare anxiety) each bag should encompass to provide the required RSI value. Calculate the attic surface area to assistance make up one's mind the number of bags needed.
- If you lot are having a contractor do the work, calculate the RSI value that you lot desire and check the numberless of insulation to be used. They should indicate the surface area that ane purse volition encompass at the selected insulating value. You and the contractor should then agree on the total number of bags to exist used, the expected insulating value and the minimum settled depth of insulation throughout the attic, based on a specific density.
- Think to seal the attic hatch (see Figure 4-7).
- Seal and insulate upwards to party walls in attached housing (see Office 5.ane, General considerations for all attics).
- Do not cover recessed light fixtures unless they are installed in approved covers.
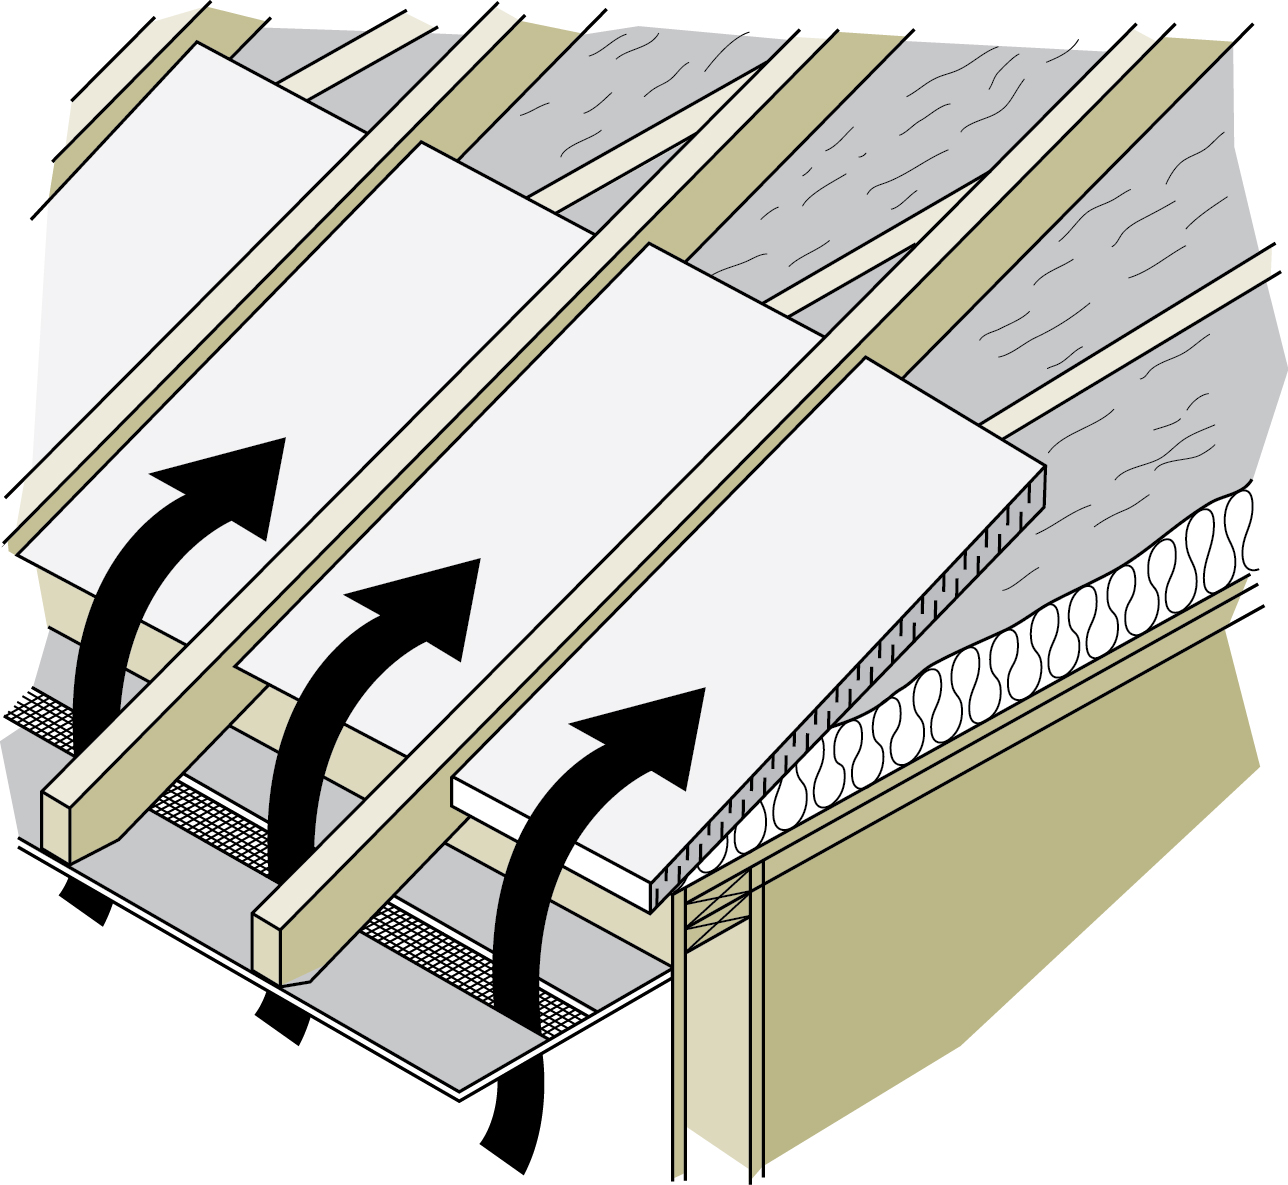
Figure 5-11 Baffles can exist used to maintain airflow through the soffit vents
Larger image

Figure 5-12 Fitting insulation effectually cross bracing
Larger image
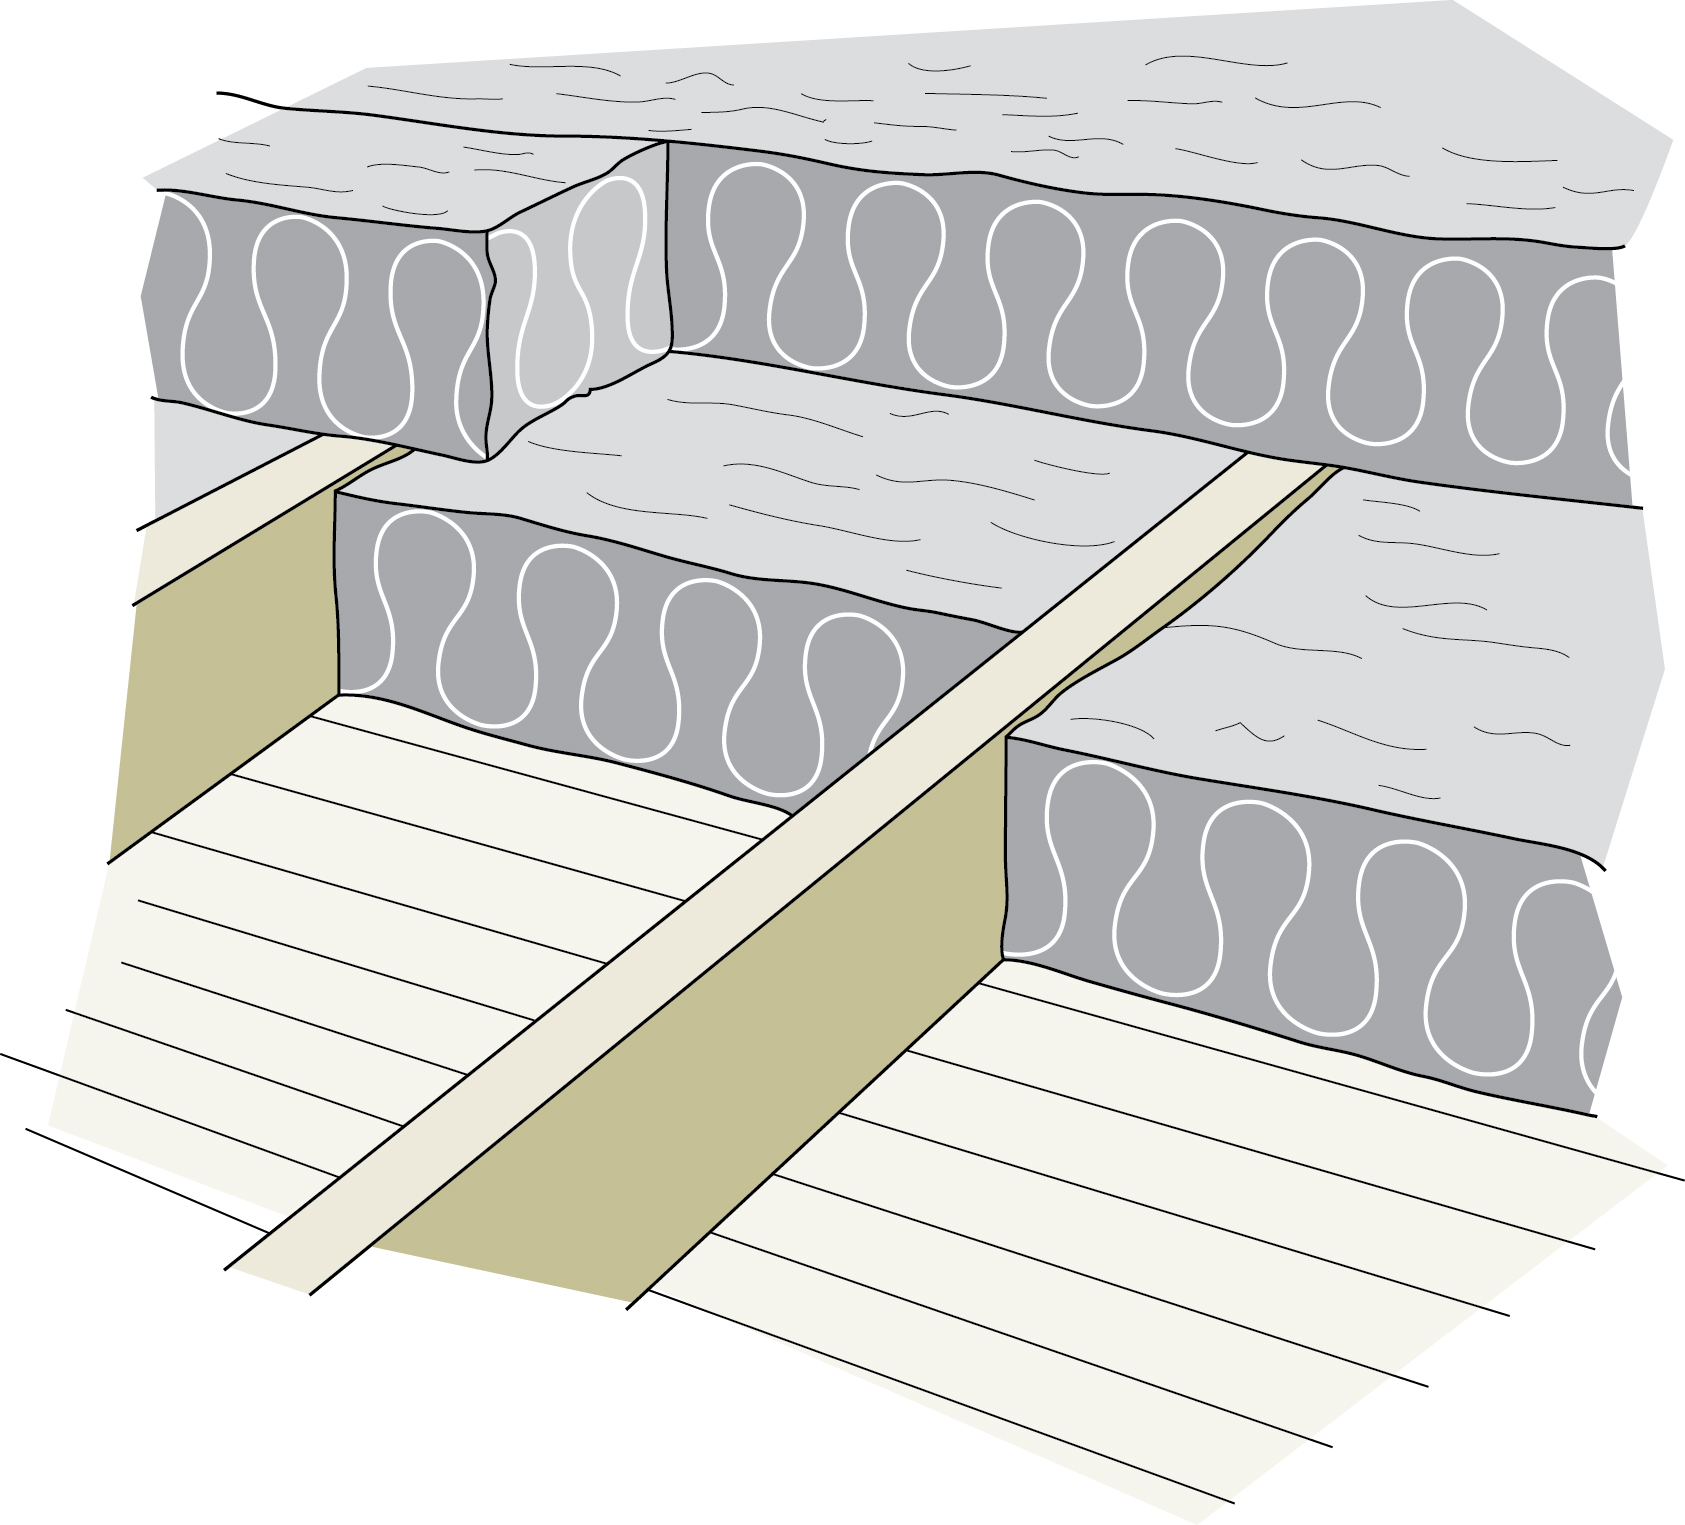
Figure v-13 The top layer of insulation runs perpendicular to the lesser layer
Larger image
Effigy v-14 Installing loose-fill insulation.
Note the markers that indicate the concluding depth of the insulation.
Larger image
5.ii.4 Ventilation
Ideally, 50 percent of the cranium ventilation openings should be continuous soffit vents, and the other 50 percent gable, ridge or roof vents. Figure v-fifteen shows various types of vents. Any of them are adequate when used in conjunction with soffit vents. Ridge vents are preferable where practical, simply must be equipped with baffles to deflect wind blowing up the roof and to prevent the penetration of water and snow. Occasionally, a firm volition just have soffit vents. In this case, install gable end, ridge or roof vents to take advantage of cross ventilation.
Different types of ventilation
- Soffit vents
- Gable cease vent
- Ridge vent
- Roof vent
Effigy 5-15 Roof venting
Larger image
5.3 HOUSES WITH One-half STOREYS
Houses with 1 ½ or ii ½ storeys have attics with several small Parts that may make access, air sealing and insulating very hard. If you cannot get into these spaces, you may have to hire a contractor. If the infinite is accessible, the following Part gives some guidelines on how to do the work yourself.
5.three.1 Air and vapour control
Where you have admission to the attic space, follow the directions for the control of air and vapour flows as outlined in Part 5.2, Easily accessible attics.
Houses with one-half storeys have one major source of air leakage that must non be overlooked: through the ceiling joists immediately below the knee joint walls (run across Figure 5-17). This disquisitional air leakage area must be sealed flush with the dorsum of the knee wall end. This can be done past cutting and fitting foam lath that will fill up that ceiling joist opening and seal it into place with caulking or spray foam.
Another choice may be to dense-pack loose-fill insulation between the floorboards and the ceiling below while ensuring that an air barrier is installed.
five.3.ii Ventilation
Ventilate the attic spaces above and beside the summit storey separately by using gable vents. Position the vents to prevent air current from blowing through the insulation.
A second option is to utilize gable vents in the area above the attic ceiling and eave vents in the side areas. This is a good choice if the firm already has working eaves vents (see Figure 5-nineteen). A ventilation infinite in the rafter Role will permit airflow between the insulated areas.
Otherwise, you will take to install rafter vents in the Role along the rafters to ensure adequate ventilation (see Effigy 5-18 and Figure v-xix). These vents must be on the cold side of the infinite, while the warm side can be filled with insulation that can be added to the sloping ceiling portion unless other arrangements are made in the renovation process.
5.three.3 Insulation

Effigy 5-16 The wall and floor Parts of a half storey should be insulated
Larger image
Spray cream and rigid foam insulation can be used, simply batts are less expensive and easier to handle in confined spaces. If in that location are whatsoever electrical outlets (apply care to avert shocks – and also take this opportunity to upgrade wiring in this area) or pipes in the knee joint wall, keep them on the warm side of the air and vapour barrier and insulation, and seal the air and vapour bulwark around them.
- Treat the attic floor backside the knee wall and the cranium space above the one-half storey's ceiling (encounter Figure 5-17) exactly as described previously for a standard, unfinished attic; in add-on, add air sealing under the knee wall.
- Treat end walls as described in Section 7, "Insulating walls."(Stop walls are the full-height walls that are exposed to the exterior.)
- The knee wall can be treated like an unfinished attic floor (see Figure v-9), making allowances for the fact that it is vertical. Install a combination air and vapour bulwark made from polyethylene strips sealed between each stud. Sealing all cracks and penetrations and painting a vapour barrier on the interior surface also can create the air barrier. Adjacent, install the insulation and secure it in place with edifice paper, paper-thin, olefin sheets or chicken wire. Ameliorate however, nail 25 mm (one in.) or more than of rigid board insulation to the exterior side of the studs to hold the insulation. This will also increase the thermal resistance of the wall Part and reduce thermal bridging. A wall in the attic that adjoins a heated space can also exist insulated like a knee wall.
- The Part between the rafters may be filled with insulation if all penetrations through the ceiling are sealed and if this is permitted by local edifice codes or standards (see hot roof in Part 5.2.ii, Concentrate on air sealing, subPart Spray foam nether the roof). The hot roof could involve the slope ceiling and then the knee wall space. It is unlikely to exist necessary in the modest triangular elevation attic. Having an insulated roof slope allows the knee wall spaces to exist used for storage (as they ofttimes are).
- Exposed foam in accessible areas must be fire protected.
- Due to limited infinite for insulation and venting on the sloping ceiling, consider adding rigid board directly to the ceiling, and then air seal and comprehend with drywall. This method will profoundly increment comfort levels in summer and winter, though it may reduce headroom.
- Some contractors specialize in loftier density blown insulation that will help reduce airflow while improving thermal values.
Dormer windows
Many ane ½ or 2 ½ storey houses have dormer windows. The walls of the dormer may be insulated with batts, as described for the articulatio genus wall. Dormers typically include a lot of framing members that limit the corporeality of insulation that tin can be added. As well air sealing, consider dense-pack blown-in insulation and also the add-on of rigid board insulation and drywall to reduce thermal bridging.
Floorboards
Some houses will have the attic floored over, even when information technology is not used equally living space. You can insulate it past lifting the floorboards and treating it as you would an unfinished attic, though some or all of the boards may accept to be replaced to maintain the ceiling stiffness.
Alternatively, a contractor can fill the subfloor space completely by blowing in dense-pack loose-fill up insulation through access holes. Air leaks, such equally around plumbing stacks and open eave spaces, should be sealed first. With the contractor, ensure that the infinite is filled completely and at the correct density.
Safe WARNING:
Before insulating, check for wiring (replace damaged or frayed wiring), recessed lite fixtures or other sources of rut that may be concealed below the floorboards. All oestrus sources must be protected from the insulation or removed entirely.
You will not likely be able to achieve the minimum manufacturer's recommended levels for attic insulation past filling this space lonely. If possible, add some insulation on top of the floorboards to keep them warm and to reduce thermal bridging through the joists and floorboards.
five.4 CRAMPED ATTICS, CATHEDRAL CEILINGS AND Flat ROOFS
Larn virtually the methods for insulating difficult areas.
five.4.one Cramped attics
At that place are three options for insulating an attic that is too cramped to work in:
- Insulate on pinnacle of the existing roof (encounter Part 5.five, Ice dams).
- Add together rigid board and drywall to the ceiling if there is adequate headroom.
- Have an experienced contractor blow in dense-pack loose-fill insulation.
The last two options can likewise exist done together. The first and last methods may apply where there is inadequate headroom.
There volition likely be no way of installing a new sheet-material air barrier. If one does not already exist, information technology should still exist acceptable to install insulation if there is no bear witness of moisture bug, if humidity levels in the house are reasonable and if any air leaks through the ceiling into the cranium are sealed. You can reach added protection by painting the ceiling below the attic with latex vapour bulwark pigment (ask paint suppliers or manufacturers) or 2 coats of oil-based pigment.
Ensure that the contractor prevents insulation from entering the eaves and blocking the ventilation. If at that place are any recessed light fixtures, chimneys or other sources of estrus in the attic, make sure precautions are taken to avoid creating a burn hazard.
Ventilating cramped attics can be difficult because of the difficulty of creating an adequate airflow. Where the roof extends past the outside walls, it may be possible to use soffit vents in combination with roof vents or congenital-upwardly ridge vents.
Many houses with cramped attic spaces lack eaves. In such cases, approach ventilation with caution. The best approach is to carefully seal the ceiling below the attic from inside the business firm and so insulate without installing additional vents.
If possible, check the roof infinite for wet problems during or just after a cold snap in mid-winter. Some frost is to exist expected, merely if the buildup is especially heavy, y'all will have to vent the space, thoroughly seal all air leaks and reduce humidity levels in the house. Check with local building authorities to determine which procedures are permitted in your area.

Effigy 5-17 Rigid insulation can be nailed over the studs of the knee-wall Part
Larger paradigm
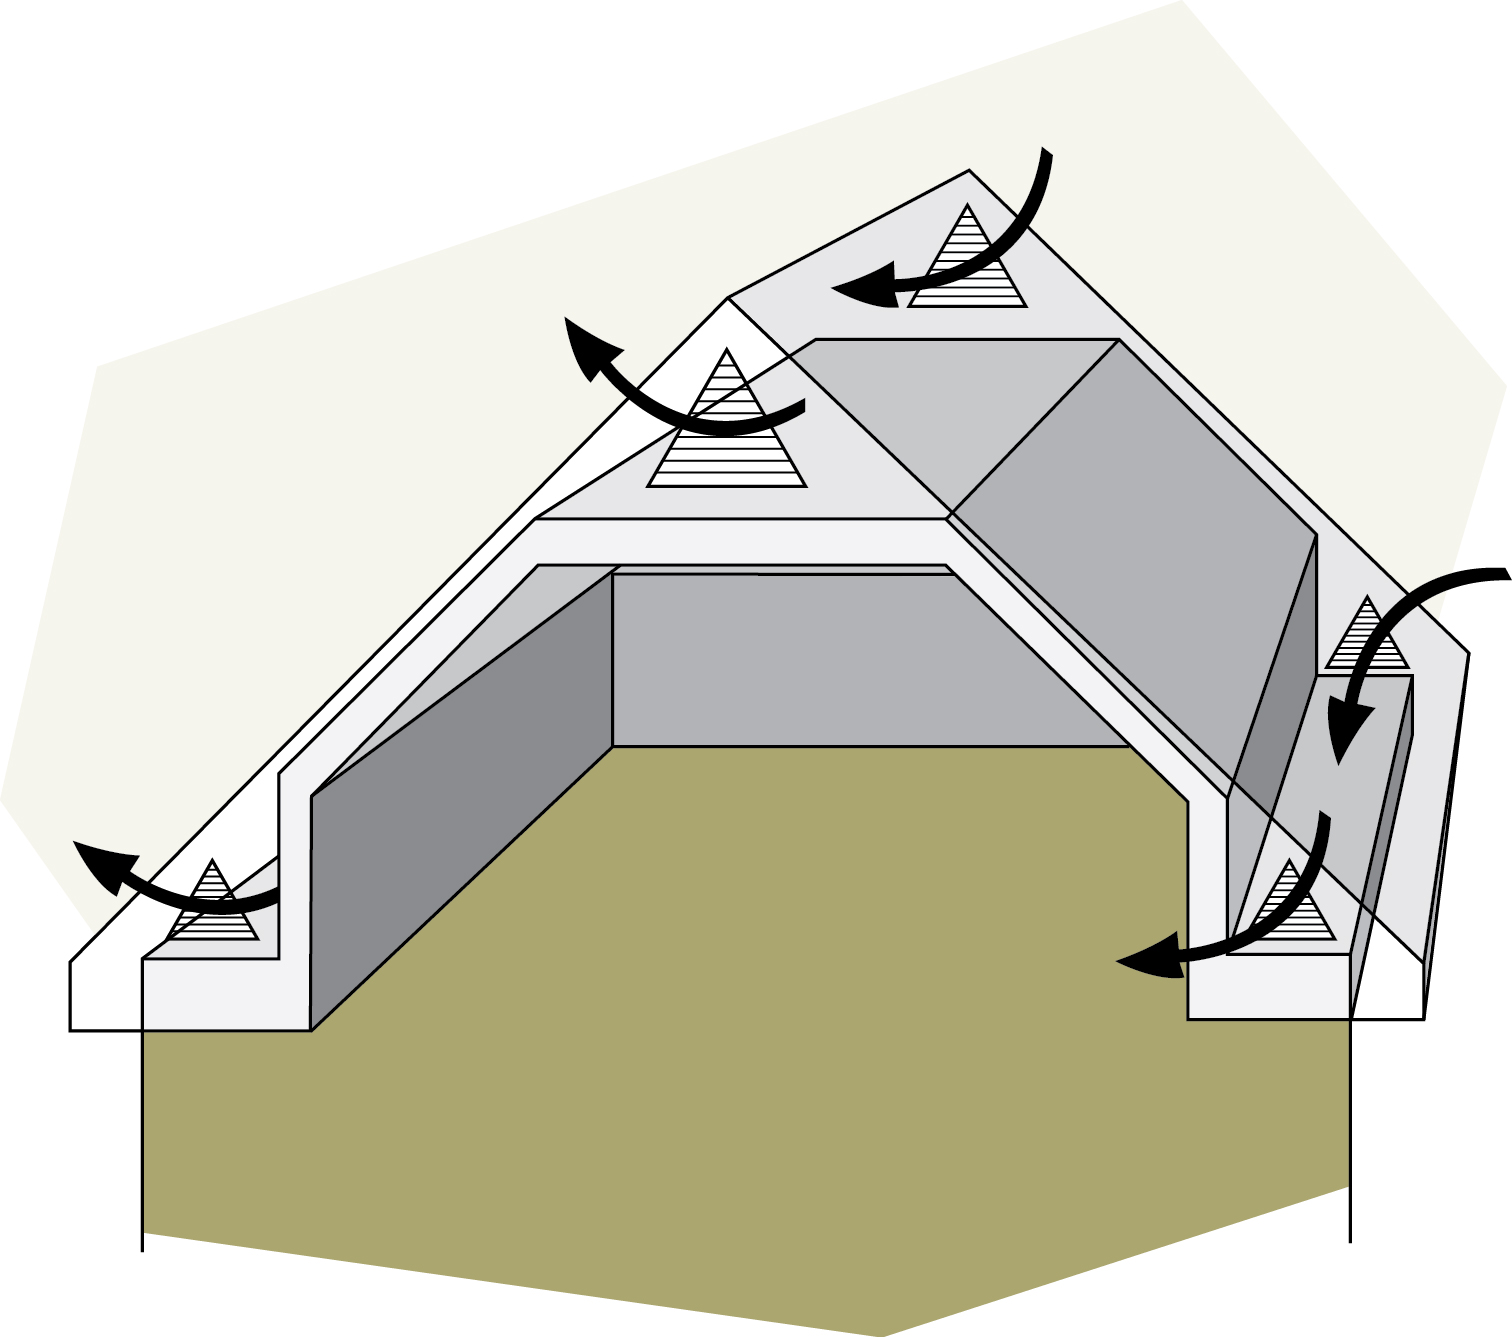
Figure 5-xviii Each Part has its own cross ventilation
Larger image
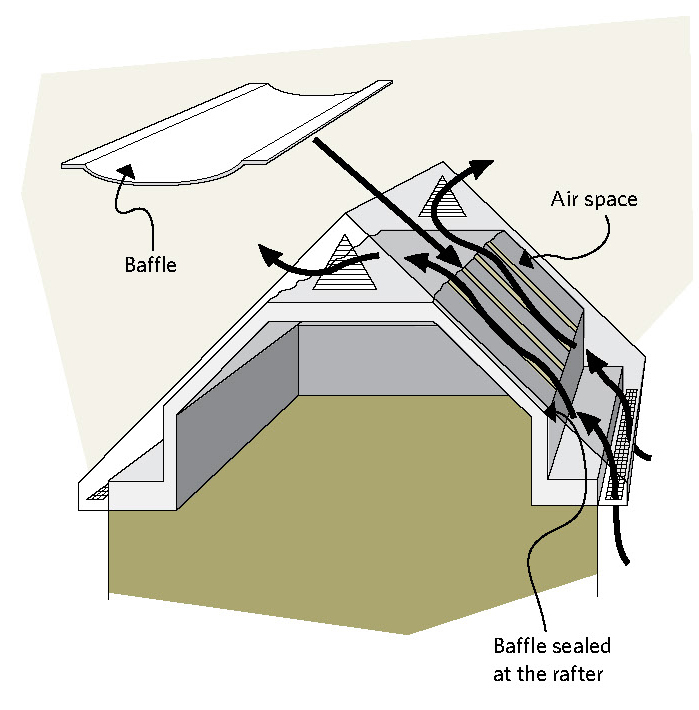
Figure 5-xix Ventilation occurs betwixt Parts through attic rafter vents installed in the rafter Part
Larger paradigm
5.iv.2 Cathedral ceilings and apartment roofs
A business firm (or whatsoever portion of a business firm) with a apartment roof, cathedral ceiling or some other attic-less construction is difficult and will require the services of a qualified contractor.
The main trouble with these roofs is the limited space for insulation and ventilation. If there is already some insulation in the joist space, trying to add more than may not exist beneficial. Nonetheless, if you decide it is worth your while to increase insulation levels, in that location are a number of options. Each selection involves some risk of either moisture problems or thermal bridges that can reduce the effectiveness of the insulation. A technique involving blown insulation is discussed below.
Part v.6, Renovations and repair, discusses both interior and outside retrofits, including the improver of a new roof. The existing space betwixt the ceiling and roof can be dense-packed with cellulose or glass fibre loose-make full insulation past a contractor. Densities are typically betwixt 56 to 72 kg/yard³ (3 ½ to iv ½ lb./cu. ft.). The contractor should summate and confirm the density for each roof cavity.
This approach eliminates roof ventilation, so it is generally not recommended (check with local building authorities outset). However, the high density of the insulation, combined with comprehensive air sealing, should reduce airflow sufficiently to avoid condensation problems.
Accept actress care to make certain that air leaks into the ceiling are sealed from below. This is difficult because wiring and plumbing usually puncture the ceiling in a number of places. Moreover, the partition walls may not be completely blocked off at the acme, allowing large amounts of air to flow through the interior walls into the ceiling.
Where the interior walls are completely open to the ceiling, there is no easy solution unless you are prepared to have your interior walls diddled total of insulation and sealed along all trim, outlets and other penetrations.
5.5 ICE DAMS
Water ice dams are large masses of ice that collect typically on the lower edge of a roof and in the gutters. Every bit melting snow (or rain) runs downward the roof, it meets this water ice mass and backs upward, sometimes nether the shingles and then leaking into the attic.
Ice damming commonly occurs when there is a significant amount of snowfall on the roof. The snow itself, especially when deep, can deed as an insulator. If the attic temperature is in a higher place freezing, it warms the roof sheathing, which melts the layer of snow that is in straight contact with the roof. Melt water runs down the roof until it meets the overhang.
If the air and the overhang are below freezing, the h2o freezes on the roof and starts the water ice dam. In add-on, southerly exposed dark wall siding heated by the sun can crusade warm convection currents to enter the eave and roof area above it, causing ice damming.
5.v.1 Roof type and ice dams
Uninsulated attics usually exercise not accept ice dams considering the rut coming through the attic tends to melt snowfall equally information technology lands and prevents much accumulation. A well-sealed and insulated attic results in a cool roof and mostly will also not accept ice dams. Water ice dams are more frequent if many valleys and dormers complicate the roof or there is a large overhang. More complicated types of roofs hold more snow because they are more than prone to have more than thermal bridging and air leakage areas.
5.5.two Locating areas prone to ice dams
One way to find areas prone to ice dams is to look at the roof after the first heavy frost in fall or calorie-free snow. Notation where the snow melts showtime and detect out what is nether that spot. One common sight in such conditions is a horizontal melt line across the roof of a 1 ½ storey house, where the short genu wall meets the ceiling. Other places would be beneath a roof-ducted exhaust fan, plumbing vent, under a skylight and above a leaky attic access hatch. The best prevention for ice damming is to seal all attic air leaks and insulate thoroughly.
Dark wall finishes can absorb solar oestrus and cause warm convection wall currents that may be to blame for water ice dams. Sealing the associated soffit vents may assistance reduce the problem. Even so, other venting may still be required to ensure that the roof space is properly vented.
5.5.3 Dealing with restricted cranium infinite
Many attics, including those under low-sloped roofs, do not have enough space for adequate insulation at the border of the attic floor. If soffit insulation requires a baffle to continue a ventilation opening against the capsule, in that location may but be nigh 100 mm (4 in.) of space left for insulation. This restricted insulation level volition permit the snow to melt but above the overhang and promote ice damming.
Try to put the best insulation possible at that edge to reduce rut loss. Spray foam is ideal equally it air seals every bit well as insulates. Cut pieces of extruded polystyrene will assistance equally well. Install a piece of extruded polystyrene 25 mm (1 in.) from the capsule to maintain the ventilation air space and and then fill between this foam lath and the attic flooring with insulation (see Effigy v-22).

Figure five-22 Creating ventilation space with rigid insulation
Larger image
5.v.4 Cathedral ceilings
Ice dams on roofs with cathedral ceilings are more hard to resolve as they are harder to access. The same principles apply to preventing water ice dams – stopping firm air leaks, upgrading insulation, peradventure improving roof ventilation. Ice dam issues on cathedral-blazon roofs are commonly all-time dealt with by contracting an insulator with dense-pack insulation experience or when re-roofing.
5.5.5 Installing a new roof
When re-covering, remove the roof finish and the capsule, air seal and fill up the cavities with insulation then install the new roofing materials, including an ice-shield membrane. A well-sealed roof will demand footling to no ventilation. If you are uncertain almost whether or not the sealing tin can be done effectively, leave a ventilation channel under the sheathing from the soffit to the meridian. Sometimes insulation can be added to the ceiling inside, although this approach will not stop the air leakage.
An alternative measure out to prevent ice dams is to make the roof impermeable by using a self-sealing membrane under the shingles. Building codes crave such membranes on the lower office of the roof in new houses. These membranes exercise non finish water ice dams, only they forbid the h2o from leaking through the roof capsule and into the house. Ice damming tin can still occur and perhaps damage shingles and gutters.
five.5.6 Quick fixes and their limitations
There are many pop, quicker solutions but they have drawbacks:
- Attaching electric heating cables will melt channels in the ice, sometimes alleviating a problem, simply they use a significant amount of electrical energy while being an eyesore on most roofs.
- Removing gutters will go on them from becoming ice traps, but gutters go on roof water abroad from the foundation.
- Attacking ice dams every winter with an axe or ice pick will impairment the roof surface.
- Although removing snow from the roof will also assistance, removing ice dams and snow is not always easy or safe to do.
- For sure older houses with complicated roofs, it may be impossible to completely eliminate ice dams without resorting to several dissimilar techniques.
The preferred solution for near houses is to keep house oestrus out of the attic by air sealing and insulating.
5.6 RENOVATIONS AND REPAIR
Renovations or repairs provide an opportunity to ensure a well-insulated cranium ceiling and walls with an constructive air and vapour barrier.
A popular renovation activity is to catechumen an existing unfinished attic into a new living space. Depending on the depth of the rafter space, it may be hard to achieve the recommended high attic RSI values. If you cull to terminate your attic, bank check for local code requirements and so consider the following steps:

Figure 5-23 Collar beams or collar ties provide additional support
Larger epitome
- Install collar ties betwixt every pair of rafters (come across Figure 5-23). These ties will provide structural support for both the roof and the new ceiling.
- Ensure that the insulation installed in the rafter spaces fits snugly against the top of the walls to course a continuous thermal envelope. There must be no gaps around the perimeter of the attic flooring, otherwise heat will escape and ice damming may occur near the eaves. In almost cases, it should be possible to insulate each rafter space all the way down to the eaves and over the top of the exterior wall. Leave a clear infinite between the top of the insulation and the underside of the roof capsule to allow for roof ventilation. Seal any roof vents into the parts of the cranium that are non heated.
- Staple a continuous polyethylene air and vapour barrier to the rafters and end-wall studs; then advisedly seal the edges and seams with acoustical sealant.
- If your attic is non besides cramped, consider adding strapping onto the rafter bottoms and wall studs to allow for more insulation (up to the recommended minimum level for attic insulation, if possible). Afterward installing insulation in the existing cavities, nail or screw strapping (2 ten ii or 2 x 3 on-border) perpendicular to the rafters and studs. Space the strapping to adapt the width of the insulation you lot will use. However, the strapping should be no more than than 610 mm (24 in.) apart – measured on centre – or yous volition accept difficulty attaching the interior finish. Fit insulation snugly between the strapping, covering all the rafters and studs. Finally, staple a continuous, sealed polyethylene air and vapour barrier to the strapping. Alternatively, secure rigid board insulation 25 to 50 mm (1 to ii in.) to the rafters and studs, seal or install a vapour barrier and and so comprehend with an canonical finish (e.g. drywall).
- Insulation between the neckband ties is applied from below in much the same way, with a continuous polyethylene air and vapour barrier practical final. If the collar ties have already been insulated and if there is admission to the upper portion, and so more insulation may be added as in a normal attic.
five.vi.1 Dropped ceiling

Figure 5-24 Extending the rafters provides space for insulation and ventilation
Larger image
Where headroom is sufficient, constructing a dropped ceiling to hold insulation is an first-class way of thermally upgrading a cathedral ceiling or apartment roof, especially when planned every bit function of a renovation. The following are several options:
- Construct a new ceiling immediately below the existing ceiling. If the roof has exposed joists or beams (usually for decorative purposes), it may be possible to close the space, which creates a new ceiling. Install batts or rigid insulation in the infinite followed by a continuous air and vapour barrier and a new ceiling. In all cases, y'all must prevent warm air from getting into the new cavity space and bypassing the insulation. Seal the perimeter of the new ceiling and any possible air leakage paths through partition walls.
- With the ceiling removed, extend existing rafters or trusses to accommodate boosted insulation. Cross strap the existing rafters or extend the rafter cavity with 2 x 4 lumber and plywood gussets (see Figure v-24).
Although it is not necessary to remove the interior finish and expose the rafters and tops of the walls when amalgam a new ceiling, it is a good idea. This will allow you to perform air sealing, bank check the state of the insulation and verify if in that location is a vapour barrier.
- Mechanically fasten rigid board insulation directly to the construction of an existing ceiling. Although this technique avoids the mess and time required to tear down the ceiling, information technology will make access to the space between the ceiling and the attic floor more difficult (eastward.g. to install recessed light fixtures). If rigid board insulation doubles equally the air barrier, fit the boards tightly and seal the seams well. Extend electrical fixtures to accommodate the depth of the new ceiling.
5.half-dozen.2 Adding a new roof
Insulation can besides exist added on elevation of an existing ceiling or roof. This option is most suitable for cathedral ceilings and flat roofs when major exterior alterations, such equally a new roof, are required. Air sealing, installing new insulation, sheathing, roofing surface and replacing eavestroughs, soffits and fascia plus disposal will cost several 1000 dollars. You will almost certainly need the services of a qualified contractor.
One method involves installing rigid board insulation on top of the existing roof (meet Figure 5-25). The college RSI value of rigid insulation means a smaller increase in the roof thickness, although several layers of insulation may exist needed to see the desired RSI level.

Figure 5-25 A new insulated roof tin be built over the old roof
Larger image
Sheet polyethylene is offset placed on the existing roof to provide the air and vapour bulwark, following the i/3 – 2/three rule. Alternatively, a layer of airtight-cell spray foam or low-permeability rigid board can be installed with the joints taped to prevent air leakage. This step is not necessary if an air barrier is already in place.
It is important to insulate (i.e. cake) and air seal the spaces betwixt the joists forth the perimeter of the roof. This prevents heated air from escaping around the insulation. Line upwardly the edges of the blocking material with the within finish of the outside wall and thoroughly caulk all seams. Another approach is to hire a spray foam contractor familiar with air sealing to cake these critical areas.
Some other method is to build up the existing roof or to frame a new roof and fill it with batt insulation or loose-fill insulation, which is diddled in. Ensure that the air and vapour barrier is tightly sealed. The new space or roof frame may add to the structural loading of the entire assembly, so this must be done following local code requirements.
This approach is best done with new trusses or past installing cross members (called purlins) that span the length of the roof. Once the purlins are in place, the new rafters are installed, followed by the proper installation of the insulation to avoid air movement and thermal bridging. Leave enough clear space to a higher place the insulation and above the new roof rafter to allow for ventilation.
Back: Department four: Comprehensive air leakage command Next: Section 6: Basement insulation
Source: https://www.nrcan.gc.ca/energy-efficiency/homes/make-your-home-more-energy-efficient/keeping-the-heat/chapter-5-roofs-and-attics/15637
0 Response to "What Type of Insulation Can You Leave Outside in the Rain and Sun"
Post a Comment